Looking for a fun, simple, speech and language-filled craft with items you probably already have laying around the house? Look no further!
Items Needed:
-
2 paper plates
-
Box of crayons or markers
-
Optional paint and paint brush
-
Yellow and orange construction paper OR white paper
-
Scissors
-
Googly eyes
-
Yellow felt or feathers
-
Glue
-
Round head fastener
Decorate the plate
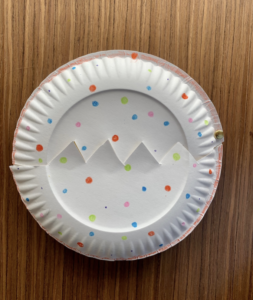
Take one of the plates. Turn it upside down and decorate with markers, crayons or the optional paint and paint brush. Feel free to encourage creativity while decorating or stick to the classic blue egg color!
Cut the plate
Once the egg design is complete, cut the plate in half with zig zag cuts. The egg should look like it cracked!
Make the chick
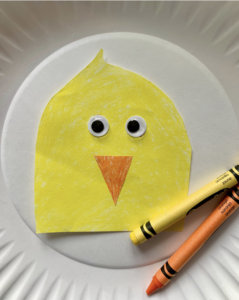
Cut a round shape with the yellow paper (or white paper colored yellow) as the chick’s body. Cut a small triangle with the orange paper (or white paper colored orange) as the chick’s beak. Next, glue the googly eyes and orange beak onto the chick’s body. Finally, glue two wings (can use either yellow feathers or cut yellow felt) on either side of the chick’s body.

Attach the chick
Take the extra white paper plate and place it face up (as if it were to have food on it!) Glue the chick to the middle of the plate.
Complete the egg
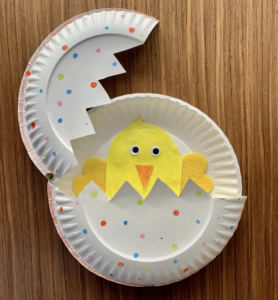
Place the two halves of the decorated egg directly on top, with the decorated side facing up. The chick should be hidden in between the plates. Make a small hole through the two halves of the decorated egg and the plain white plate. Adhere all plates together with a round head fastener.

Slide the plates to crack the egg and find the chick!

Ways to incorporate speech and language skills:
-
Following directions- Read a step aloud and have your child use listening skills to complete the step!
-
This craft can encourage two-word combinations for little ones, such as: “open egg” or “hi chick!”
-
This craft is filled with adjectives! The child can describe the chick (fluffy wings, big beak) or egg (blue egg, cracked egg) they created.
-
Print out the craft instructions and have your child highlight words with their target speech sound in it, such as the “R” sound. Practice the words by themselves or while reading the entire instructions aloud!
-
Complete the craft and have your child retell how they made it using descriptive language and short-term recall skills!
-
This craft pairs perfectly with a Spring egg book, such as “The Great Big Easter Egg Hunt” or “Llama Llama Easter Egg”! Research shows that using themed learning provides foundational skills and meaningful connections to new concepts.
-
Once the craft is complete, have your child write down step-by-step instructions in their own words! Do they have any tips that helped them complete a step? Anything they would change? Encourage them to include all their ideas!
